The Aeroccino milk frother is a great addition to your Nespresso machine, but it requires different techniques to make traditional milkshakes and lattes.
Nespresso offers three different milk frothers, each designed to enhance your recipes and provide an exceptional frothing experience. These include the Aeroccino 3, Aeroccino 4, and the Barista Recipe Maker. All of them share common features such as ease of use, efficiency, and elegant design. Among these options, the Aeroccino 3 stands out as the most popular, often included with Nespresso machines as a standard addition.
In this guide, we will explore the proper usage of your Nespresso milk frother, focusing on the popular Aeroccino 3 model.
What is Milk Frother and How it Works?
A milk frother is an essential device used to froth milk, creating creamy and foamy cappuccinos or lattes. Milk frothers come in various shapes and sizes, ranging from battery-operated, hand-held whisks to electric machines.
The Nespresso Aeroccino Milk Frother is a simple, easy-to-use machine that quickly and efficiently froths milk for your coffee drinks. The Aeroccino works by heating and spinning the milk using a whisk or propeller, resulting in a thick and creamy foam.
You can also adjust the amount of froth that the Aeroccino produces. To do this, simply adjust the knob on the side of the Aeroccino. Turn it to the right to increase the amount of froth and to the left to decrease it.
The Aeroccino also comes with a built-in timer, which allows you to set the desired frothing time. This ensures that you get just the right amount of foam every time.
Steps to Use Nespresso Milk Frother
Nespresso milk frothers are simple to use and can make preparing your morning coffee or tea a little bit more fun. Here’s how to use one:
1. Select Desire Milk
The Nespresso milk frother is capable of making both steamed and frothed milk.
If you’re aiming for a cappuccino with cloud-like milk foam, frothing is the way to go. For those who prefer a latte, steamed milk is the key ingredient. Steaming involves heating the milk to a certain temperature without introducing as much air as in the frothing process.
Here’s how you can make the necessary adjustments:
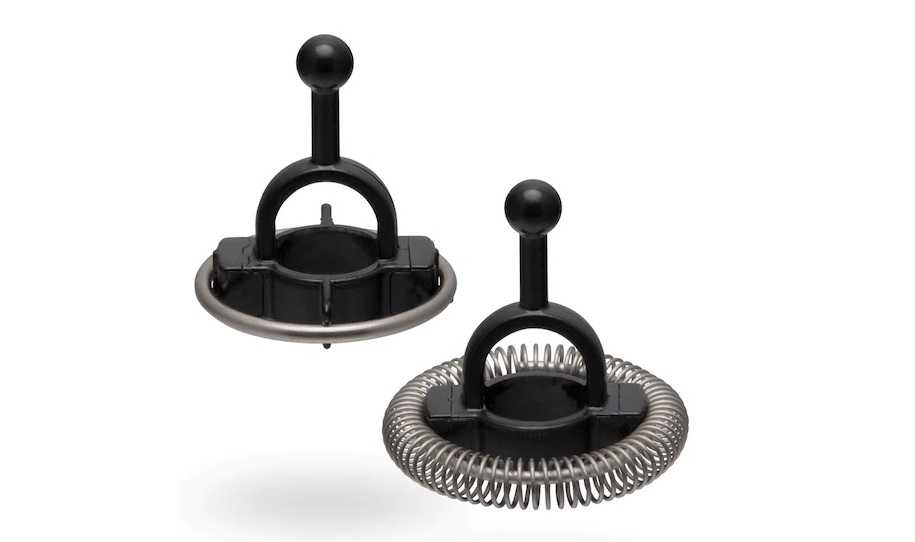
- For frothing milk for a cappuccino, Leave the coil ring around the whisk. This configuration will create the perfect conditions for frothing milk, allowing you to achieve that dreamy foam consistency.
- For steaming milk for a latte, Simply pop off the coil ring from the whisk and set it aside. Removing the coil ring will enable you to steam the milk without excess air incorporation.
2. Choosing the Right Milk
Depending on whether you’re frothing or steaming, you’ll need to consider the appropriate milk level. If you’re using the coil ring for frothing, never fill the pitcher above the lower max line. This prevents any potential overflow during the frothing process. However, if you’re not using the coil ring, you can fill the pitcher up to either max line, depending on the size or number of drinks you’re preparing and how much milk you prefer.
To achieve the perfectly frothed or steamed milk for your Nespresso beverages, it’s important to select and add the right amount of fresh milk to the Nespresso Milk Frother. The process of adding milk may vary depending on the type of drink you’re making and the desired level of creaminess and foam.
Follow these steps to add your fresh milk to the Nespresso Milk Frother:
Choose the right milk: For the best frothing results, it’s recommended to use whole milk at refrigerator temperature. Whole milk contains an optimal balance of lactic sugar, protein, and fat, resulting in the perfect level of creaminess and foam. If whole milk is not your preference, 2% reduced-fat milk is a good alternative as it still provides a satisfactory taste and texture. Skim milk, on the other hand, lacks the necessary fat content to produce the desired results.
Consider the freshness of the milk: When your milk container has been open for three or more days, the protein properties of the milk can start to change due to exposure to light and oxygen. This can affect the frothing capability of the milk. To mitigate this, shake the milk well before pouring it into the frother. Additionally, if you’re using older milk, you can try a cold frothing cycle followed by a warm frothing cycle. This may yield more froth even with less fresh milk.
Plant-based milk options: If you prefer non-dairy milk, options like almond, oat, or soy milk are suitable choices. These alternatives froth well and create foam, particularly those labeled as “barista versions.” However, it’s important to note that other non-dairy milks such as cashew or coconut milk may not produce foam as dense as the aforementioned options.
3. Frothing the Milk
The Nespresso Milk Frother gives you the flexibility to choose the temperature of your frothed milk, whether you prefer it hot or cold. Depending on your preference, you can easily adjust the temperature setting using the simple button controls of the Aeroccino 3.
Hot Froth: If you want your milk froth to be hot, simply press the button on the Nespresso Milk Frother once. The frother will begin the frothing process and heat the milk to the optimal temperature. During this operation, the light on the frother will turn red, indicating that it is making hot froth.
Cold Froth: If you prefer your milk froth to be cold, you can achieve this by quickly pressing the button on the frother twice within 2 seconds. The frother will initiate the frothing process while keeping the milk at a cold temperature. During the cold frothing operation, the light on the frother will turn blue, indicating that it is producing cold froth.
4. Combine Milk and Espresso
While the Nespresso Milk Frother is in operation, use your Nespresso machine to prepare a shot of espresso or double espresso. The Nespresso machine will deliver a rich and flavorful espresso that forms the base of your drink.
When selecting Nespresso pods for milk-based drinks, opt for dark roast pods with a higher intensity level. These pods tend to work best when combined with frothed milk. Additionally, Nespresso offers pods like the Vertuo Bianco Leggero that are specifically recommended for use with milk.
Once your freshly brewed espresso is ready, pour the desired amount of frothed milk from the Nespresso Milk Frother into the espresso. The frothed milk will blend harmoniously with the espresso, creating a delicious and creamy coffee beverage.
5. Cleaning and Maintenance
Cleaning your Nespresso Aeroccine might seem like an easy task. But it’s always best to keep them clean after every use to avoid bacteria growing inside and causing nasty smells to spread. Follow these simple steps to clean your Nespresso milk frother the right way!
- Firstly, you should turn off the machine and detach it from the base.
- Then, disconnect the whisk and carefully remove the seal from the lid.
- Thoroughly rinse the whisk, seal, and lid with clean water.
- Clean the inside of the milk jug with a soft, non-abrasive sponge and cold water.
- Finally, let it dry with a clean and damp cloth.
Note: The milk jug is not dishwasher safe and should not be submerged in water.
Tips and Tricks for Perfect Frothed Milk
- Use cold milk for better frothing results.
- If using non-dairy milk, shake it well before frothing to prevent separation.
- Experiment with different froth consistencies by adjusting the frothing time.
- For latte art, gently swirl the frothed milk to create a smooth texture.
- Add syrups or flavorings to your frothed milk for a personalized touch.
Troubleshooting Common Issues
Froth not creamy enough: Ensure you’re using the right milk and that it is cold.
Frother Blinking Red: It indicates that there might be an issue that needs attention.
Frother not heating: Make sure the frother is correctly placed on the base and that it’s clean.
Conclusion
With the Nespresso Milk Frother, you can elevate your coffee experience by creating professional-grade frothed milk at home. By following the simple steps outlined in this article, you’ll be able to enjoy barista-quality beverages in the comfort of your own kitchen. So go ahead, unleash your inner barista, and savor every sip of your perfectly frothed creations.
FAQs
Can I froth non-dairy milk with the Nespresso Milk Frother?
Yes, the Nespresso Milk Frother can froth non-dairy milk alternatives such as almond, soy, or oat milk.
How long does it take to froth the milk with the Nespresso Milk Frother?
On average, the frothing process takes around 90 seconds to complete.
Can I use the Nespresso Milk Frother for cold froth?
No, the Nespresso Milk Frother is designed to heat and froth the milk simultaneously.
How do I clean the Nespresso Milk Frother?
After each use, detach the lid and whisk and rinse them with warm water. Wipe the base with a damp cloth.
Can I make latte art with the frothed milk from the Nespresso Milk Frother?
Yes, you can create latte art by gently swirling the frothed milk to achieve a smooth texture.

