Keurig Not Turn On After Descale

Keurig Won’t Power On After Descaling? (SOLVED)

Today, I’m here to talk about a common problem that many Keurig owners have experienced: when your Keurig won’t turn on after descaling. It’s frustrating when your trusty Keurig suddenly stops working, especially after you’ve gone through the effort of descaling it. Whether you have the fancy K Supreme, the upgraded K Supreme Plus, or the compact and convenient K Slim model, I understand how disappointing and confusing it can be when your Keurig refuses to power on. 

But don’t worry because I’m here to help you figure out what’s going on and troubleshoot this issue to get your Keurig back to brewing perfect cups of coffee. 

So grab a cup of coffee (from an alternative source for now), sit back, and let’s dive into this problem together!

Why Keurig Won’t Turn On After Descaling

Now, you might be wondering, “Why does this happen?” Don’t worry, for I shall shed light on this perplexing situation.

The most common reason behind this issue is a thermal switch that trips when your Keurig gets too hot during descaling. Think of it like a cautious guard that watches over the temperature inside your machine. When things heat up too much, this switch goes into action, causing your Keurig to lose power and sit there like a powerless lump.

But fear not! We can fix this problem with a few easy steps. I’ll reveal those steps in the next section.

Now, let’s not forget that life is full of surprises, and our mischievous Keurigs can throw us a curveball now and then. While the thermal switch is often to blame, there are a few other troublemakers in the mix. A power source that’s not working right could be sneaking around. Or maybe our Keurig is just getting too darn hot inside, making it shut down.

The solutions to our Keurig troubles are just a few paragraphs away. We’re about to take a peek inside your coffee buddy and conquer these obstacles, bringing back the joy of that perfect morning cup of joe!

How To Fix Keurig That Won’t Power On After Descaling

Of course, I won’t leave you hanging. The moment we’ve all been waiting for – the grand reveal of the steps to fix that stubborn Keurig that won’t power on after descaling. I shall guide you through this troubleshooting adventure with the finesse of a seasoned barista.

1. Check The Power Source

Let’s start with the basics. Check the power source. Unplug your Keurig brewer, wait a moment, and then plug it back in snugly. Give it a gentle push to securely insert it into the socket. Now, let’s give it a go and try turning on the machine. If it still refuses to cooperate, don’t lose hope just yet. Grab your Keurig and shuffle it to a different spot in your kitchen, preferably where you can reach a completely different wall outlet.

Remember, we’re on a mission here, so avoid using the outlet above or below the one you just tested. Got it? Good.

If the power issue continues to play hard to get, we need to eliminate any doubts. Grab another kitchen or handheld appliance and plug it into one of the outlets you tested earlier. If that second appliance happily springs to life, it’s a clear sign that there’s a problem with your coffee maker.

2. Water Reservoir Position

Let’s turn our attention to the water reservoir. Sometimes, the detachable water tank might not be clicked all the way into place, leading to a Keurig that won’t budge.

Simply remove the water reservoir and reattach it, ensuring a satisfying click that signals it’s properly in place. Oh, and take a peek at the water level too – make sure it’s not overflowing like a river gone wild.

3. Reset the Thermal Switch

Now, here comes the tricky part. We suspect that the pesky thermal switch got tripped during the descaling process, leaving your Keurig in a sullen state.

Firstly, give your machine some time to cool down, unplug it, and let it chill for a couple of hours. This allows the thermal switch to reset itself, like a tired bear awakening from hibernation. Once the waiting game is over, plug your Keurig back in and hope for the best.

In the rare event that the thermal switch remains stubbornly unresponsive, it’s time to call in the big guns – customer service. If your machine is still within the purchase guarantee, they’ll come to the rescue and sort things out.

However, if your Keurig is no longer under warranty, don’t despair just yet. You can attempt to disassemble the machine yourself (carefully, mind you) and reset the thermal switch using a trusty paper clip.

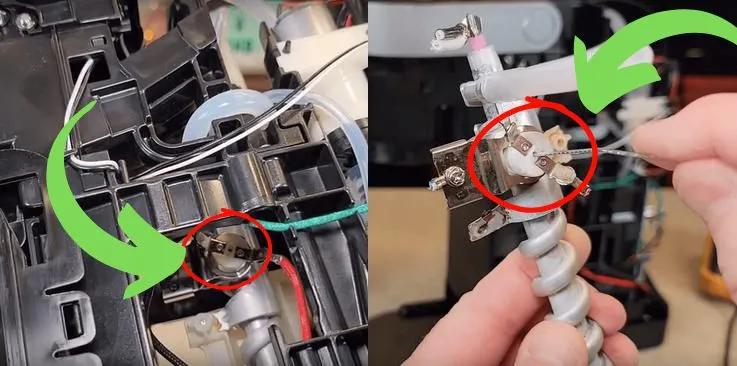
The Keurig Thermal Switch looks like this.

Keurig Won't Power On After Descaling
Keurig Thermal Switch

How To Disassemble The Keurig?

To disassemble your Keurig, start by unplugging it and removing the water reservoir.

Now, let’s take a look at the sides of the machine. You’ll notice small pins holding the sides to the base. Look from below, and you’ll spot these pins doing their job of keeping the side cover in place.

Use a screwdriver to push the pins in while gently lifting the side cover, allowing it to pop out and release those hooks. You can also try inserting the screwdriver between the base and sides to get the pins out.

With all the pins unhooked, lift the side cover completely. It might take a few lid open-close maneuvers to get the cover off entirely.

How To Reset The Thermal Switch On Keurig?

Now, it’s time to reset that elusive thermal switch.

Locate a small white cap with a hole in the middle and wires on each side. If you look from the front of the coffee maker, you’ll find it on the right side, attached to the spiral heating element. A keen eye will spot it when peering from the side.

Take a trusty paper clip, needle, or toothpick and gently push it into the center hole of the white cap. You won’t hear a satisfying click, but that’s normal.

Just ensure you push it in enough to reset the coffee maker. And voila! Your Keurig should spring back to life, ready to brew you that heavenly cup of coffee.

You can also watch this video to get a visual understanding.

Preventive Measures for Future Descaling

Now that we’ve triumphed over the Keurig power-on problem after descaling let us turn our attention to preventive measures. After all, an ounce of prevention is worth a pound of cure, especially when it comes to our beloved coffee companions.

To ensure smooth sailing in future descaling endeavors, here are a few preventive measures to keep in mind:

Regular Maintenance

Don’t wait until your Keurig cries out for help. Incorporate regular maintenance into your coffee routine. Follow the manufacturer’s guidelines for descaling frequency and stick to it religiously. This will help prevent any stubborn buildup that can lead to power-on issues.

Use Filtered Water

The quality of water used can make a significant difference in your Keurig’s performance. Consider using filtered water to reduce mineral deposits and other impurities that can accumulate over time. This simple step can go a long way in keeping your machine in top shape.

Descaling with Care

When it’s time to descale, follow the instructions meticulously. Use the recommended descaling solution and ensure proper dilution. Avoid shortcuts or substituting with alternative cleaning agents, as they can do more harm than good. Take the time to descale thoroughly, giving your Keurig the TLC it deserves.

Sale
Keurig 3-Month Brewer Maintenance Kit
26,316 Reviews
Keurig 3-Month Brewer Maintenance Kit
  • INCLUDES: 4 Keurig Rinse Pods, 1 Descale Solution, and 2 Water Filter Cartridge Refills
  • RINSE PODS: reduces flavor carry-over between brews
  • QUICKEST WAY TO CLEAN YOUR K-Cup pod holder: rinse away residue and oils that can build up in your coffee maker
  • EASY TO USE: use just like you would a regular K-Cup pod

Avoid Overfilling

Just as we don’t like being overstuffed, your Keurig feels the same way. Avoid overfilling the water reservoir, as it can lead to spills, leaks, and potential damage to the machine. Follow the indicated water level marks and keep things within the recommended range.

Clean and Clear

Alongside descaling, keep your Keurig clean and clear of any debris. Regularly remove and clean the removable parts, such as the water reservoir and drip tray. Check for any clogs or blockages in the needle or the brewing system and clear them gently. A little maintenance goes a long way in preventing future power-on woes.

By embracing these preventive measures, my fellow coffee connoisseurs, you’ll be equipping yourself with the tools to maintain a harmonious relationship with your Keurig. Remember, a little effort today can save you from the frustration of a powerless machine tomorrow.

Conclusion

We’ve embarked on a journey to unravel the enigma of a Keurig that refuses to power on after descaling. Through our quest, we’ve discovered the common culprit: a tripped thermal switch due to overheating during the descaling process. We’ve also explored other potential issues, such as power source problems and water reservoir positioning.

But fear not, for armed with our newfound knowledge, we’ve delved into the realm of troubleshooting and found solutions to tackle these challenges head-on.

So, let us bid farewell to those frustrating moments of a Keurig that won’t power on after descaling. Armed with troubleshooting know-how and preventive measures, we can confidently navigate the realms of coffee-making, savoring each sip of our perfectly brewed elixir.

Share Via
Ronald Miller

We write everything about coffee and espresso machines for a few years. Our goal is to provide you with helpful content that you can trust based on our own personal experiences, information from manufacturers, and tips and tricks shared by coffee and espresso machine users online.