Have you ever experienced the frustration of your Keurig clicking but not powering on when you’re in need of a perfect cup of joe? It’s definitely a disappointment. This guide aims to address this common issue among Keurig users and provide you with solutions to get your Keurig up and brewing again in no time.
So, let’s dive right in and troubleshoot this Keurig clicking issue together!
Why is Keurig Clicking and Not Powering On
If your Keurig coffee maker is clicking but not powering on, the thermal switch has been tripped. This usually happens when the machine gets too hot or encounters a technical malfunction. The tripped thermal switch acts as a safety measure, causing your Keurig to stop functioning. The clicking sound you hear is the machine’s failed attempts to initiate the brewing cycle, which it can’t do due to the tripped switch.
The thermal switch is a crucial component of your Keurig coffee maker as it helps prevent the machine from overheating, which could lead to significant damage or even a fire hazard. This switch is sensitive to temperature changes within the machine and activates to shut down the machine when it detects excessively high temperatures.
If the thermal switch has tripped, the immediate step to take is to allow the machine to cool down. Unplug it from the power source and let it sit for a while until it has completely cooled. This ensures that any overheating issue that may have caused the thermal switch to trip is resolved.
Once the machine has cooled down, you can try powering it back on. If it powers on without any issues, then it was likely a temporary overheating problem. However, if your Keurig coffee maker still doesn’t power on, it indicates a more persistent issue.
In such cases, it’s best to seek professional help. Do not attempt to reset or replace the thermal switch by yourself unless you are confident in your technical skills. Resetting or replacing the thermal switch involves opening the machine, which can be dangerous if not done correctly. Additionally, performing such actions may void your machine’s warranty.
However, if your Keurig is no longer under warranty, don’t despair. You can attempt to disassemble the machine yourself (carefully, mind you) and reset the thermal switch using a paper clip.
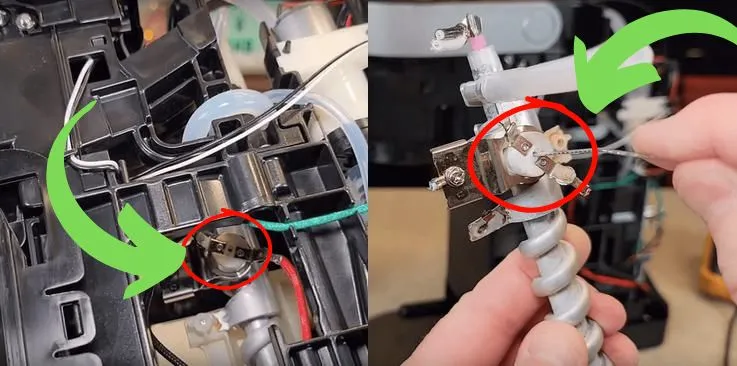
The Keurig Thermal Switch look like this.
How To Disassemble the Keurig (to Reset Switch)
- To take apart your Keurig, start by unplugging it and removing the water tank.
- Next, look at the sides of the machine. You’ll see small pins that hold the sides to the base. These pins keep the side cover in place.
- Using a screwdriver, push the pins while gently lifting the side cover. This will release the hooks and allow the cover to come off. You can also try inserting the screwdriver between the base and sides to remove the pins.
- Once all the pins are unhooked, lift the side cover completely. It may require a few attempts to completely remove the cover.
Reset the Thermal Switch On Keurig
Now, let’s reset that tricky thermal switch.
Find a small white cap with a hole in the middle and wires on each side. If you look from the front of the coffee maker, you’ll see it on the right side, connected to the spiral heating element. It’s easier to spot when looking from the side.
Take a paper clip, needle, or toothpick and gently insert it into the center hole of the white cap. You won’t hear a click, but that’s normal.
Make sure you push it in enough to reset the coffee maker. And there you have it! Your Keurig should start working again, ready to brew a delicious cup of coffee.
You can also watch this video to get a visual understanding.
Other Reasons for Keurig Clicking and Not Powering On
Experiencing a clicking, non-responsive Keurig? There could be a few other culprits behind this, ranging from debris buildup to power cord issues, software glitches, or mineral scaling. Let’s briefly explore each of these potential issues.
Debris or mineral buildup: Flow lines within the Keurig can accumulate debris or mineral deposits, similar to a traffic jam on a highway. This obstruction makes it difficult for the water (the “traffic”) to pass through, resulting in a distinctive clicking noise. The clicking sound indicates a blockage problem.
Power source and cord issues: Check if your Keurig is properly plugged in and if the power outlet is functioning correctly. A loose connection or a tripped circuit breaker could be the cause. Examine the power cord for any visible signs of wear, such as frayed wires, cuts, or burns, as these can disrupt the machine’s operation.
Software glitches: Just like computers or smartphones, Keurig machines can experience temporary software glitches. A simple reset by unplugging the machine, waiting for a few minutes, and then plugging it back in can often resolve these hitches.
Mineral scaling: Mineral deposits from tap water can accumulate inside your Keurig over time, leading to scaling. This buildup can result in unusual noises or performance issues. Descaling the machine using a descaling solution or a homemade solution of white vinegar and water can dissolve these mineral deposits.
How To Fix Keurig Clicking and Not Powering On Issue
Here are some detailed troubleshooting steps you can follow to address the clicking and not powering on issue with your Keurig:
1. Checking the Power Source and Cord
First things first, let’s ensure your Keurig is getting the power it needs. Start by checking the power outlet. Is it working properly? You can test this by plugging in another device, like a lamp or a phone charger. If the other device works, the outlet isn’t the issue. If it doesn’t, you might need to reset a tripped circuit breaker or replace a blown fuse in your home’s electrical panel.
Next, inspect the power cord. It should be securely plugged into both the outlet and the back of the Keurig machine. Look for any visible signs of damage, such as cuts, fraying, or burns. A damaged cord can be a safety hazard and should be replaced immediately. If you’re not sure how to replace it, consider reaching out to a professional or Keurig’s customer service for guidance.
2. Resetting the Brewer
Sometimes, your Keurig needs a quick break. Like any electronic device, it can experience minor software glitches that can be resolved with a simple reset. To do this, unplug your Keurig from the power source and let it sit for a few minutes. This brief period of ‘rest’ allows the machine’s internal components to cool down and reset. After waiting, plug the machine back in and see if it powers up. You’d be surprised how often this simple step can bring your Keurig back to life.
3. Descaling the Machine
Over time, minerals from the water can build up inside your Keurig, causing a condition known as scaling. This can lead to a variety of issues, including that annoying clicking sound. Descaling involves using a special solution to dissolve these mineral deposits.
To descale your Keurig, you’ll need a Keurig descaling solution, which you can purchase from Keurig or a home goods store. You can also use a homemade solution of equal parts white vinegar and water. Follow the instructions provided by Keurig or on the descaling solution to complete the process. This usually involves filling the reservoir with the solution, running several brew cycles without a K-Cup, and then repeating the process with fresh water to rinse the machine.

4. Cleaning the Needles
Your Keurig’s needles are like the heart of the brewing process. They pierce the K-Cup and allow hot water to flow through, extracting the coffee. But over time, coffee grounds and mineral deposits can clog these needles, leading to brewing issues.
To clean the needles, you’ll need a thin, flexible tool like a paperclip. Unplug your Keurig and open the top where you insert the K-Cup. You should see a needle. Carefully insert the paperclip into the needle to dislodge any debris. Be gentle to avoid damaging the needle. Repeat this process with the bottom needle located inside the K-Cup holder.
5. Checking the Water Reservoir
The water reservoir is another critical component of your Keurig. It holds the water your machine heats up to brew your coffee. If the reservoir isn’t properly seated, your Keurig might not be able to draw water in for brewing, leading to operational issues.
To check the reservoir, remove it from the machine and inspect it for any cracks or leaks. If you see any crack or damage, you can order a new Keurig Reservoir.
Also, look inside to see if there’s any debris that could be blocking the water intake. Rinse the reservoir with warm, soapy water, then thoroughly rinse and dry it before reattaching it to your Keurig. Make sure it’s securely in place before attempting to brew a cup of coffee.
Contacting Keurig Support
If you’ve tried all the troubleshooting steps and your Keurig is still clicking and not powering on, it’s time to call in the experts. Keurig’s customer support team is a valuable resource for resolving more complex issues.
Before you reach out, gather all the necessary information about your Keurig. This includes the model number, the approximate age of the machine, and a detailed description of the issue. If you’ve attempted any troubleshooting steps, be sure to mention those as well. This information will help the support team understand your issue and provide the most effective assistance.
You can contact Keurig’s customer support in several ways:
Phone: Keurig’s customer service phone number is typically listed in your user manual and on their website. This is often the quickest way to get help, especially for more complex issues.
Email: If you prefer to write out your issue, you can email Keurig’s customer support. This method might take a bit longer for a response, but it allows you to provide a detailed explanation of your issue.
Live Chat: Many companies, including Keurig, offer live chat support on their website. This can be a quick and convenient way to get help, especially for simpler issues or quick questions.
Wrapping Up
And there you have it, folks! We’ve explored the common reasons why your Keurig might be clicking and not powering on, and walked through some detailed troubleshooting steps. Keurig’s customer support is just a call or click away if all else fails. Don’t let a hiccup with your machine come between you and your favorite cup of coffee.
Frequently Asked Questions (FAQs)
Why does my Keurig click but not turn on?
There can be several reasons why your Keurig clicks but does not turn on. It could be due to a faulty power switch, a malfunctioning circuit board, or a problem with the heating element. It’s recommended to contact Keurig’s customer support for assistance in diagnosing and resolving the issue.
Can using tap water cause the clicking issue?
No, using tap water does not directly cause the clicking issue. However, tap water may contain mineral deposits that can build up over time and lead to scaling or clogging within the Keurig. This can affect the machine’s performance and potentially result in clicking sounds. Regular descaling of your Keurig can help prevent this problem.
What should I do if the clicking issue persists after troubleshooting?
If the clicking issue persists even after attempting the troubleshooting steps mentioned earlier, it is recommended to contact Keurig’s customer support. They have trained technicians who can provide further guidance and support to resolve the issue. They may suggest additional troubleshooting steps or advise you on repair or replacement options if necessary.

