Picture this: you’re half-asleep, shuffling into your kitchen in the morning, eyes barely open, and all you crave is that first sip of coffee to kickstart your day. But alas, your Keurig isn’t dispensing water. It’s more than a slight inconvenience—it’s a downright mood killer! You know it, I know it, and most importantly, Keurig knows it.
That’s why we’re here to walk you through some troubleshooting tips to get that sweet, sweet java flowing again.
Common Issues with Keurig Machines
Keurig machines are designed to provide a hassle-free coffee brewing experience. However, there are times when you may encounter issues with water not pumping or dispensing properly. Some common problems include:
- Keurig not turning on or no power.
- Keurig not heating water.
- Keurig not brewing a full cup.
- Keurig not pumping or dispensing water.
- Undesirable qualities such as bad taste or specks in your cup
If you are specifically experiencing the last issue, where the Keurig is not pumping or dispensing water, the following troubleshooting steps will help you identify and resolve the problem.
Detecting Keurig is not Pumping Water
So, how do you know your Keurig won’t pump water? Look out for signs such as your machine turning ON and then OFF abruptly, a persistent “Add water” message on the screen, a stall in the pre-heating stage, or an unusually long drip time. If your brew tastes off or there are unexpected specks in your cup, these are all red flags that your Keurig isn’t pumping or dispensing enough water.
Troubleshooting for Keurig Not Pumping or Dispensing Water
If you’ve confirmed that your Keurig is indeed not pumping water, it’s time to get your hands a little dirty. Here’s a list of troubleshooting steps to get your machine back in working order:
Check Power and Connectivity
The first thing you need to do is ensure your Keurig machine is receiving power. Check if the power cord is securely plugged into a functioning outlet. If you’re using an extension cord, it might be worth testing the machine plugged directly into a wall socket to rule out any power delivery issues from the extension cord.
Verify Brew Settings
Your Keurig machine comes with different brew settings that allow you to customize your brew. These settings include selecting the cup size and temperature. Incorrect settings can lead to problems like the machine not pumping enough water or the coffee not tasting right. Ensure that you’ve selected the right cup size and temperature according to your preference.
Not Enough Water in Reservoir
The water reservoir is where the Keurig draws water to brew your coffee. If there’s not enough water in the reservoir, the machine won’t be able to pump water. This is why it’s crucial to keep an eye on the water level and refill the reservoir as necessary. There will typically be a “Max Fill” line indicating the maximum amount of water the reservoir can hold.
Remove and Reinstall Water Reservoir
If step one does not work, you can also check the water magnet alignment, which identifies the water level inside the tank. Sometimes the water magnet can get misaligned due to brewing vibrations, so Keurig may not detect how much water is inside the machine and will stop dispensing water. Sometimes, the reservoir may not be seated correctly, leading to water flow issues. Ensure a snug fit to guarantee proper water dispensing.
To align this, tap the tank close to where the magnet is housed. If it doesn’t move, try giving it a little shake. If still no luck, you may need to replace the water reservoir.
Disable Keurig Auto-Off Feature
The auto-off feature is designed to turn off your Keurig machine after a certain period of inactivity to save energy. However, it can also cause problems with water pumping if it turns off the machine while you’re trying to brew coffee. To avoid this, you can disable the auto-off feature from the machine’s settings.
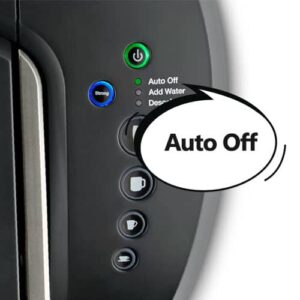
Typically, there are a number of Keurig models that have an auto-off feature. Some of them do not disable this function, and some do. These include K-Select, K-Latte, K-Cafe, and K-Elite.
To Disable on K-Select, K-Latte & K-Cafe:
- Powering the brewer off while it is still plugged in.
- Press and hold the “Strong” and “10oz” buttons for 3 seconds – the green “Auto Off” will turn off.
- Turn the brewer ON and the green light will no longer flash.
For K-Elite:
- Press settings, and go to the auto-off (moon icon) option.
- Use up and down to turn the option OFF.
- When you turn off this option, the moon icon will no longer appear on the screen.
Clean the Water Line
The water line inside the Keurig can accumulate debris over time, obstructing water flow. The first thing you should do is clear the water tank exit part. This can be done by following this process:
- Removing and emptying the water tank. Also, remove the water filter holder.
- Flip the reservoir over and locate the nozzle with the spring. Take something like an eraser end of a pencil and try pushing the spring a few times.
If the spring moves with ease that is the problem with the water line.
- Attach the tank back to the machine and fill it with a few inches of water.
- Take Turkey Baster and suck up some water.
- Splash the Baster directly into the nozzle where the tank meets the water line. This will allow you to flush out the water line and nozzle.
- Repeat this several times until the water line runs clear.
After completing this process it is important to run a hot water cycle to ensure the water line is cleaned out.
Prime the Keurig
Keurig brewer is making a grinding noise but water not coming out, which means it likely has an airlock in the water line. This is caused due to your machine running a brew cycle with not enough water in the tank. To clear a possible airlock:
- Unplug your machine and remove any K-cups from it.
- Also, remove the water reservoir and drip tray.
- Take Keurig with both hands and shake it like a rattle. Keep shaking until you notice water flowing out of the bottom.
- Put Keurig back together and try to brew again.
I know it sounds strange, but rapid movement should get rid of the air bubbles inside water lines.
Descale the Machine
Over time, mineral deposits from water can accumulate inside your Keurig, which can hinder its ability to pump water. Regular descaling can help prevent this problem. I recommend you should descale your brewer every three to six months. If you use Hard Water (high mineral content water), then you should descale it more frequently. A low-cost test kit can help you determine whether your water is hard.
Descaling involves using a solution to remove minerals and build-up from inside the coffee maker. This process can be time-consuming and requires descaling solutions. You can buy descaling solution by itself or as a pack that comes with rinse pods and filters to make it easy to keep your Keurig clean.
Clogged In Needles
The entrance and exit needles on your Keurig can get clogged with coffee grounds or scale, which can prevent the machine from pumping water. These needles puncture the K-cup and deliver the hot water that brews your coffee. If they get clogged, water can’t flow through them.
If you own a Keurig 2.0 model, you can use the orange needle cleaner tool to unclog the needle. If you have a different Keurig model, use a paper clip to remove debris from the needle.
Here’s how to do it:
- Turn off the power to the brewer.
- Remove the water reservoir from your Keurig.
- Eject the pod holder from the machine.
- Take out the funnel from the pod holder.
- Straighten one end of a paper clip and insert it into the bottom of the pod holder. Move it for a few seconds to remove any clogs.
- Rinse the pod holder and funnel with fresh water.
- Take a look at the entrance needle inside the brewer’s head. If you see any coffee grounds or calcium deposits, use a small brush or paper clip to clean them off gently.
- Reattach all the parts back.
- Turn on your Keurig and let it run for a few minutes without brewing anything. This will help clear out any remaining coffee grounds or calcium deposits in the system.
What to do If the Keurig Is Still Not Pumping?
After trying all the above troubleshooting tips, your Keurig still isn’t dispensing water, there could be a problem with the system itself. If you don’t hear motor noise when running, it may be that the motor is broken. If this is the case, the motor or the whole unit will need to be replaced.
To replace the motor, you want to disassemble the brewer and manually change it. But this is not an easy task because there is a lot of work to be done in order to change the motor. Also, the machine warranty will be void when you do this. So, I recommend you contact Keurig Support for help at 866-901-2739. They will be able to help you troubleshoot the issue and get your Keurig up and running again.
Conclusion
Dealing with a Keurig that is not pumping or dispensing water can be frustrating, but by following the troubleshooting steps outlined in this article, you can diagnose and resolve the issue. Remember to check power and connectivity, prime the Keurig, clean the needle, descale the machine, verify brew settings, and address specific issues related to insufficient water dispensing or water pumping. If all else fails, don’t hesitate to reach out to Keurig customer support for further assistance.

