Keurig Duo is a popular coffee machine known for its efficiency and convenience. However, like all coffee machines, it requires regular maintenance to keep it functioning optimally. One crucial part of this maintenance is descaling.
This guide will walk you through the process of descaling your Keurig Duo, ensuring your coffee always tastes great, and your machine lasts longer.
Why Descale Your Keurig Duo?
Descaling is a vital part of maintaining your Keurig Duo. Over time, minerals from the water used to brew coffee can build up inside the machine, affecting its performance and the taste of your coffee. Descaling removes calcium deposits that can accumulate inside your brewer. While these deposits are harmless, they can affect the performance of your machine if not cleaned regularly.
Signs Your Keurig Duo Needs Descaling
Keep your Keurig Duo running smoothly by descaling it every three months or if you notice it’s not performing like it used to. Your Keurig Duo will typically alert you when it’s time to descale. The machine’s touchscreen will display the message “DESCALE.”
Additionally, if you’re experiencing any of these issues, it might be time for a descale:
- Your coffee tastes off
- Your machine is brewing slower than usual
- Your Keurig is making strange noises
What You’ll Need
Before we dive into the descaling process, let’s gather our tools. You’ll need:
- A large ceramic mug
- Freshwater
- Keurig Descaling Solution
- Access to a sink
Now, let’s get started!
Step-by-Step Guide to Descaling Keurig Duo
Here’s a simplified and personalized step-by-step guide to descaling your Keurig Duo coffee maker:
Step 1: Preparation
Before you begin, turn off your brewer and ensure there’s no beverage pod in the K-Cup pod holder. If there is, remove it. Also, remove the water filter or plan to replace it with a new one at the end of the descaling process.
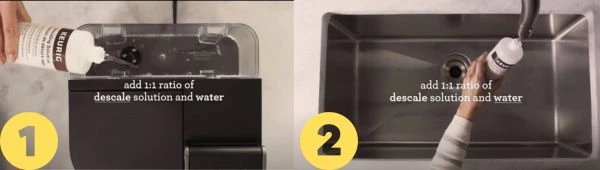
Step 2: Descaling Solution Rinse
Next, fill the reservoir with a mix of descaling solution and water. If you’re using the Keurig descaler, use one bottle of descaler and refill with one bottle of water to achieve a 1:1 ratio. If you’re using another descaler, follow the instructions on the packaging.
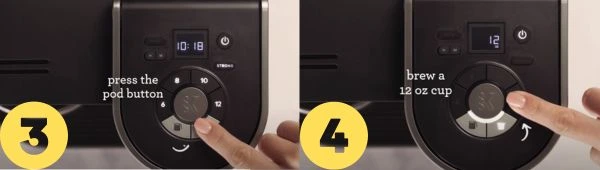
Step 3: Run the Descaling Cycle
Set your large mug on the drip tray. Switch on your brewer, select the ‘POD‘ button, then the ‘12‘ button. Hit the ‘BREW‘ button to initiate a rinse brew.
After brewing, dispose of the hot liquid in the sink.

Next, insert the carafe into the machine onto the hotplate. Press the ‘CARAFE‘ button, the ‘12‘ button, and hit ‘BREW‘ to start a carafe rinse brew. Once done, dump this hot liquid too.

Turn off the heating plate by press and hold the ‘CARAFE‘ button.
Step 4: Time for a Fresh Water Rinse & Reset
Let your brewer sit idle for at least 30 minutes. (do not power off)

After 30 minutes, discard any remaining descaling solution in the water reservoir and rinse the carafe and reservoir. Then, Fill the reservoir up to the MAX line with fresh water.
Make sure the carafe is still on the heating plate. Press the Power button, select ‘CARAFE‘, press ‘12‘, and hit ‘BREW‘ for a carafe water brew.
Once it’s finished brewing, switch off the heating plate by pressing and holding the ‘CARAFE‘ button. Dispose of this hot water.

Repeat the carafe rinse three more times – a total of four cycles.

Next, fill the reservoir to the MAX line again. Set the large mug on the drip tray and power up the brewer. Select ‘POD‘, press ‘12‘, and then hit the ‘BREW‘ button.

Repeat this step thrice – that’s four brews in total.

SIDENOTE: During the cleaning process, your Keurig Duo might produce foam. This is completely normal and is due to the reaction between the descaling solution and the calcium deposits.
If your brewer is heavily scaled, it might not fill correctly once the descaler is added. If you encounter this issue:
- Switch off your brewer and unplug it.
- If there’s a descaling solution in the reservoir, discard it. Rinse the reservoir thoroughly and refill it with water.
- Plug your brewer back in, power it on, and repeat the Step 3 Fresh Water Rinse.
- If you’re still having trouble, leave your brewer unplugged for 30 minutes before trying the rinse again.
And there you have it! A happy, clean Keurig Duo brewer ready to serve up your favorite hot beverages.
You can also download the Keurig K-Duo manual for a complete guide to the machine.
Do’s and Don’ts of Descaling
Here are some do’s and don’ts when it comes to descaling your coffee brewer:
Do’s:
- Do descale regularly: Depending on the hardness of your water, aim to descale your machine every three months or whenever you notice decreased performance.
- Do follow the manufacturer’s instructions: Always follow the recommended procedure for descaling, which may vary slightly depending on the model of your coffee maker.
- Use the right descaling solution: Different brewers may require specific descaling solutions. For Keurig machines, the Keurig Descaling Solution is recommended.
- Do rinse thoroughly: After descaling, rinse your coffee machine properly to ensure no residue is left that could affect the taste of your coffee.
- Do be patient: Descaling is not a quick process. Give the descaling solution time to work and be prepared for the process to take over an hour in some cases.
Don’ts:
- Don’t ignore signs of scale: If your coffee maker is brewing slowly, not producing a full cup, or making more noise than usual, it might be time to descale.
- Don’t use a paper cup for the descaling process: Always use a large, heat-resistant ceramic or glass mug to catch the hot descaling solution and rinse water.
- Don’t leave the machine unattended during descaling: Stay close by in case there are any issues, such as overflow or foaming.
- Don’t use vinegar unless instructed by the manufacturer: While some online sources recommend vinegar as a natural descaling solution, it can damage certain coffee makers and void your warranty.
- Don’t forget to remove any coffee pods or filters before descaling: Your machine should be empty before you start the descaling process.
Problems Facing After Descaling K Duo
After descaling your Keurig K Duo, you may face a few problems. Here’s a look at some of the potential issues and their solutions:
- Keurig Duo Error Code Problems: After descaling, you may notice error codes popping up on your Keurig Duo’s display. Each error code indicates a specific problem with the brewer. If you’re seeing an error code, follow the guidelines provided on Fixing Keurig Duo Error Code Problem for identifying the issue and troubleshooting.
- Keurig K Duo Descale Light Won’t Turn Off: Sometimes, the descale light on your Keurig Duo doesn’t turn off even after the descaling process. This could mean that the machine still detects scale build-up. To rectify this issue, you might need to repeat the descaling process, ensuring that you thoroughly rinse your machine afterwards. More information on this can be found in this article: Keurig K Duo Descale Light That Won’t Turn Off.
- Keurig K Duo Not Pumping Water: If your brewer isn’t pumping water after descaling, there could be a blockage in the water lines, often due to mineral deposits. This may require you to perform a few additional steps to resolve, as outlined in this guide: How To Fix Keurig K Duo When It’s Not Pumping Water.
- Keurig Duo Carafe Side Not Working or Not Brewing Full Pot: Another problem you might encounter is the carafe side of your Keurig Duo not working properly or not brewing a full pot after descaling. This issue could also be due to a blockage or other malfunction. Follow these steps to troubleshoot and fix the problem: Keurig Duo Carafe Side Not Working or Not Brewing Full Pot.
Conclusion
To sum up, proper care and attention during the descaling process of your Keurig K Duo are crucial to maintaining its efficiency and longevity. Neglecting to use appropriate containers for the procedure, leaving the machine unattended, or using vinegar without manufacturer guidance could cause damage or even breach the warranty.
Ensure your machine is clear of coffee pods or filters before you start descaling. Post-descaling, you might experience certain hiccups such as persistent descale lights, error codes, or operational issues like a lack of water pumping or issues with the carafe side not brewing adequately. However, rest assured, these potential complications have respective solutions available in dedicated troubleshooting guides to restore your coffee maker to its prime functioning state.
FAQs
Why is my Keurig K Duo brewing slowly or noisily?
These are common signs of scale buildup. You should consider descaling your coffee maker to resolve these issues.
Why won’t the descale light turn off post-descaling?
This might mean residual scale buildup. Repeat the descaling process and rinse thoroughly.
Why isn’t my machine pumping water or brewing fully after descaling?
This could be due to a blockage in the water lines from mineral deposits, or another malfunction. There are specific steps to troubleshoot and fix these issues.


The last time I descaled my Keurig k duo essentials the add water/descale light didn’t come on when there was no more water in the reservoir. The same thing happened today when I was descaling and there was no more water in the tank and the carafe didn’t fill up to the 12 cup level. I’m puzzled.
Sometimes, mineral deposits can block the water flow, affecting both the descaling process and the indicator lights. Make sure all parts are clean and free of blockages.
Read this guide to get better idea: https://mycoffeecity.com/keurig-k-duo-descale-light-that-wont-turn-off/